Kit Preparation
A
word of encouragement: You may be involved in cutting or preparing a few or
even thousands of items that will go into Living Water Quilt Project kits. The
task may be tiring. Ask the Lord whom we serve with our hands to keep your mind
sharp, on task and encouraged as you do this work for him. Also, remember to
pray for the women who will touch each piece of fabric you have prepared.
From the Lord’s heart to your heart,
From your heart to your hands,
From your hands, to her hands,
From her hands to her heart,
May He
be glorified!
|
FABRIC PACKET |
Inventory:
|
Item |
Quantity for 1 Block |
Quantity for 100 Blocks |
|
Fabric
Element: A |
1 |
100 |
|
AA |
1 |
100 |
|
B |
1 |
100 |
|
C |
1 |
100 |
|
D |
1 |
100 |
|
E |
1 |
100 |
|
CC |
1 |
100 |
|
DD |
1 |
100 |
|
EE |
1 |
100 |
|
F |
1 |
100 |
|
G |
1 |
100 |
|
GG |
1 |
100 |
|
H |
1 |
100 |
|
I |
8 |
800 |
|
J |
4 |
400 |
|
1X2-1/2”
Felt Patch (To hold pins and needles) |
1 |
100 |
|
Straight
Pins |
4 |
400 |
|
Needles (Sharps #8 or 9) |
2 |
200 |
|
Bobbin
with thread (Light
gray thread; min 5 yards) |
1 |
100 |
|
Identifying
card insert |
1 |
100 |
|
Plastic
Zipping-lock bag |
1 |
100 |
Instruction for Cutting and
Assembling Fabric Packets
(Assumes use of Rotary
Cutter, Mat and Ruler with ¼” seam allowance guide, and provided plastic sheets
of pre-printed templates).
Fabric
Pieces
- Using Template Plastic
and scissors cut each template out to the Solid line (not the
dashed seam allowance line).
- To cut multiple pieces
of the same template, stack the same-print fabric to 4 layers deep with wrong-side up.
- Place your plastic
template on the top layer and using scotch tape, tape 2 edges of the
template to the top layer. This setup is reusable and keeps the template
from slipping out of position (use new tape when it is no longer sticky).
- Lay your ruler on the
template to extend the edge ¼”. Cut at this ¼”- larger edge created by
your ruler – This will create the seam allowance.
- Continue the same on
all edges of the template until the shape is cut out. Set aside and repeat
until you have the number cut that you want.
- To create the “sewing
line”, separate the fabric pieces and for each piece lay the
plastic template in the center of each shape (fabric wrong-side up) and
trace a light pencil line around the template (may also use a permanent
extra fine point, non-acidic Sharpie.
Do not use water erasable pens as they will disappear in humidity).
Pins
& Needles
- Cut an approximate 1”
x 2 ½” rectangle from Felt or similar material to hold the pins and
needles.
- Insert (4) Pins and
(2) Needles into this felt piece.
Bobbin
Bobbins are used simply as a convenient means of
holding the thread for the kit. They are purchased pre-loaded with thread.
Plastic
Zipping-lock Bag
Assemble each packet such that large pieces of fabric
are stacked first - pieces like “A”, “AA”, then medium size like “B”, with
smallest sizes on top, like “C”, “CC” and “J”. Place the identifying card so
that it may be read through the pouch.
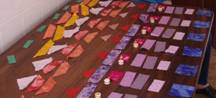
Note: It is very helpful to lay out all pieces
for multiple kits on a large table such that each kit can be assembled by
picking up the pieces in order – this insures that no woman will be missing a
piece.
Another tip is to count the fabric pieces as you pick
up and stack them – there are 25 fabric pieces plus the felt holder, the bobbin
and the identifying card insert (28 total items) that go into each plastic zipping-lock
style bag.